Estimated reading time: 4 minutes
Table of contents
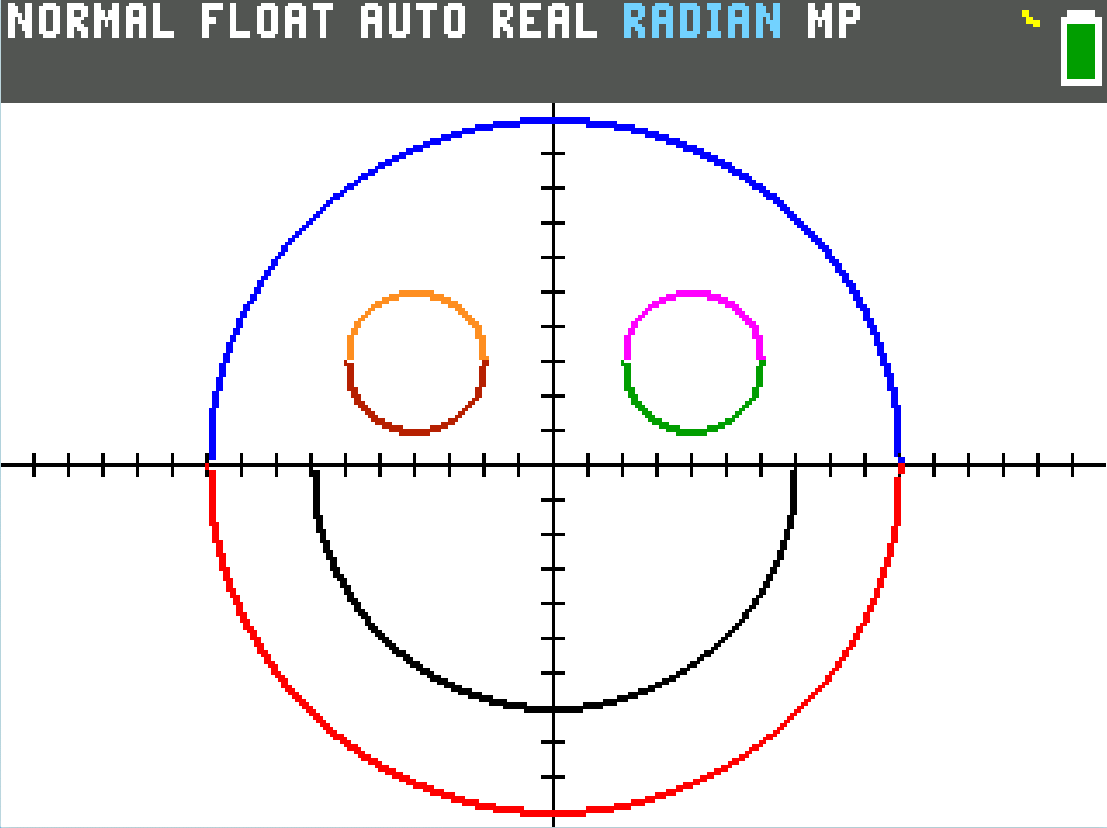
Hey there, math enthusiasts and calculator nerds! If you’ve ever stared at your TI-84 graphing calculator and thought, “This thing can do way more than just homework,” you’re in for a treat. One of the most iconic calculator hacks is graphing a smiley face using nothing but equations in the Y= editor. It’s a perfect blend of algebra, geometry, and pure fun—plus it’s a great way to really understand how circle equations work on a real device.
In this post, we’ll walk through the entire process step by step. We will also explain the math behind every curve (because understanding why it works is half the magic), show you exactly what to type, and give you pro tips to make your smiley look polished. No programming required, just some old fashioned math!

The Math Behind the Magic: Circles, Semicircles, and Square Roots
Everything in this smiley face comes from the standard equation of a circle:
- (h, k) is the center of the circle
- r is the radius
- 𝑥 and 𝑦 are the coordinates of any point on the circle
Your TI-84 graphs functions in the form 𝑦= something, so we solve the circle equation for 𝑦:
- The gives the top semicircle.
- The gives the bottom semicircle.
- The square root is only defined (real numbers) when which automatically limits the graph to the correct left/right domain. No extra restrictions needed!
This is why we use separate Y1, Y2, etc., entries: each piece is a function the calculator can plot point by point. We’ll combine full circles (head and eyes) with just the bottom half (mouth) to create that happy grin.
The Head (Big Circle, Radius 10, Centered at Origin)
For the outline of the face itself, enter the following two equations in the graphing app.
Top half of the Outline:
Bottom half of the Outline:
This is the classic circle solved for y. The radius of 10 fills most of the screen nicely.
The Mouth (Smiling Curve)
This is the bottom half of a circle with radius 7 centered at (0, 1).
Why the “+1”? Shifting the center up a tiny bit makes the smile curve upward in the right place under the eyes. Without the shift, it would sit too low. The negative square root ensures we only get the lower arc—perfect for that cheerful smile.
The Eyes (Two Small Circles, Radius 2)
Left eye (centered at (-4, 3)):
Top:
Bottom:
Right eye (centered at (4, 3)):
Top:
Bottom:
These are tiny full circles so the eyes look solid and round. The ± gives both halves, and the (X ± 4) shifts the center left or right.
Math note: The expression inside the square root, , must stay non-negative. That’s why the eyes only appear where |X – 4| ≤ 2 (and same for the left eye). The calculator handles this automatically.
Customizing Your Smiley
Try playing around with the values a bit to learn more about how the equations affect the smile. In the image below, for Y3, we swapped 49 to be 36, and changed the +1 to be a -1.


Conclusion
Graphing a smiley face is a fantastic way to understand function transformations and how algebraic equations create real shapes. Play around with it yourself and see what you can come up with!